Notes on sensor installation location selection:
1. Select a section of pipe that is full (always filled with liquid);
2. Select a straight pipe section, farther away from the elbow or pump valve. The theoretical principle is: the direction of the incoming water (upstream sensor) is 10 times the diameter of the elbow, and the direction of the return water (downstream sensor) is 5 times the diameter of the elbow. Based on the on-site working conditions, choose a place with stable water flow and few fluctuations.
Please follow the following three steps for installation and debugging:
1. Set host parameters:Please set up the M10-M14 window, and follow the prompts in the window to select or enter the actual parameters of the on-site pipeline;
M10Window: (1) Enter the outer diameter of the pipe and the thickness of the pipe wall. Please correctly enter the outer diameter of the pipe at the measurement position and press the OK key to set.
(2) Press the down key "↓" to switch to pipe selection, and press the OK key to set. Enter the pipe wall thickness. Please enter the pipe wall thickness at the measurement location correctly;
M11Window:Lining settings (if there is no lining in the pipe, ignore this)
M12Window:Select fluid type;
M13Window: (1) Select sensor type, (standard configuration selection 0. Standard external clamp C);
(2) Select the down button "↑" to switch the sensor installation mode;
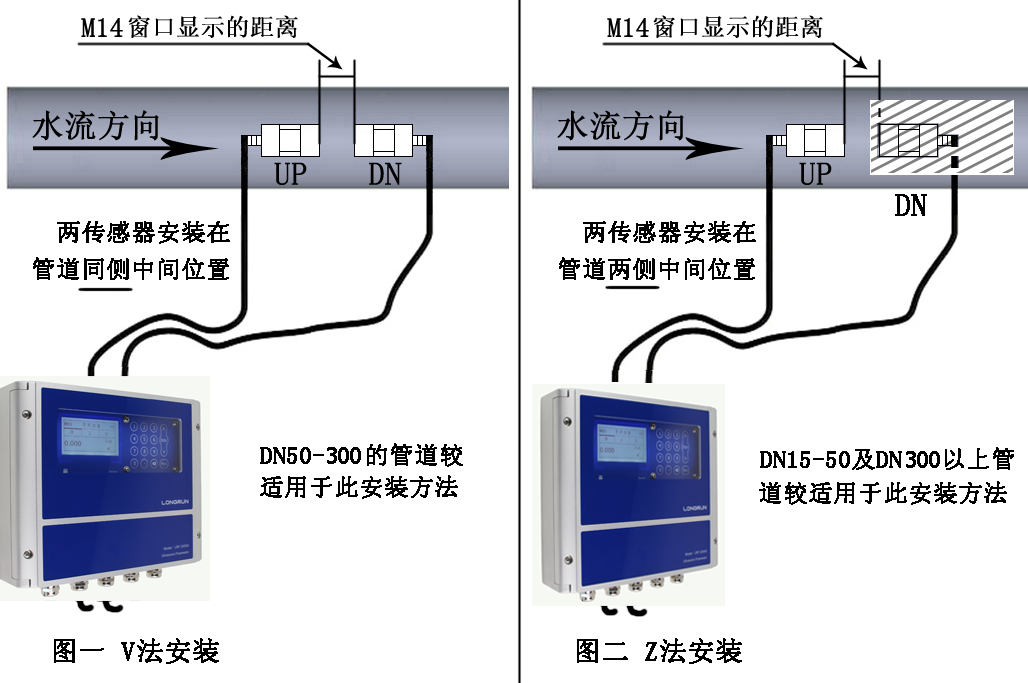
General selection principles: 1. If the pipe diameter is DN50-300, the priority is: 0. V method installation
2. If the pipeline parameters are DN25-50 and DN300 or above, the priority is: 1. Z method installation
M14Window: After the above parameters are entered correctly, the window will automatically prompt the installation distance in mm. Please note the installation distance.
2. installation sensor: Please install the sensor according to the installation distance prompted by M14 in step 1 (pay attention to the sensor installation method selected by M13 in step 1);
During this process, please pay attention to the following points:
(1) The sensor is installed in the pipelineSide MiddleLocation;(Not on top of the pipe!!)
(2) When installing the sensor, be sure to clean the surface of the pipe from rust, paint and other media that may hinder ultrasonic transmission;
(3) Please apply more couplant on the sensor so that ultrasonic waves can penetrate the pipe normally.
(4) The sensor is tied tightly with the tube bundled with the package. After installation and fixation, wait for one minute before proceeding to the next step.
3. Verify that the installation is correct:When installing the sensor, please always check the data in the M04 window:
It is correct that the upstream and downstream signal strengths are greater than 75;
Q value (signal quality) is correct if it is greater than 75;
When installed correctly, the transmission time ratio should be 100±3%; (if it is not within this range, it means that the distance between sensors needs to be fine-tuned)
If these data are satisfied, it means that your installation is successful;
Follow the above3 stepsMethod, operate it carefully. After successful installation, please return to the M01 window to observe the flow rate and flow rate normally. After using it for the first time, you will become proficient in using it again in the future. I wish you can learn to operate it as soon as possible.
To ensure correct use, please be sure to send the sensor installation diagram after the installation to confirm whether it is installed in place!





 Home


